Rainbow Power Greens Salad With Black Eyed Peas (Vegan, Gluten-Free)

This salad has a great taste, is super healthy, and pretty easy to make. The rainbow power greens salad with black eyed peas tastes so good because it incorporates a few main, awesome foods. The main ingredient is collard greens or cabbage. This will give you a ton of vitamin and iron, and pairing this with the dressing will taste great. Also, it has a healthy portion of black eyed peas. Black eyed peas have a ton of fiber, iron, and zinc – all great things to eat. I hope you try out this recipe, and tell me how you like it.

Rainbow Power Greens Salad With Black Eyed Peas (Vegan, Gluten-Free)

rainbow-power-greens-salad-with-black-eyed-peas-4-of-1-2.jpg
More At CotterCrunch

Ingredients (Yield- 2-3 Servings)

  • 2 cups cooked black eyed peas ( or you can cook a whole bag and use part of it for salad. See below for instructions)
  • 1 tbsp apple cider vinegar (if cooking peas from scratch)
  • 2-3 cup chopped purple cabbage
  • 5 cups chopped collard greens and/or mustard greens/kale
  • 2 tbsp oil
  • 1/2 of a shallot chopped
  • 1 tsp minced garlic
  • 1/2 tsp sea salt
  • 1 to 1 1/2 cup shredded carrot
  • 1/2 cup cooked quinoa (optional)
  • black pepper
  • oil/vinegar
  • lemon juice

Directions

  1. Rinse your chopped greens and and cabbage.
  2. In a medium pan, add 1 tbsp oil, shallot, garlic, and cabbage. Saute for 1-2 minutes on medium heat.
  3. Next add in your collard green, 1 more tbsp oil, and sea salt. Cover for 3 to 4 minutes on medium heat or until greens are wilted.
  4. Remove from heat and place all the ingredients from the pan into a large bowl.
  5. Add in your carrots, cooked quinoa, cooked black eyed peas, and a splash of lemon juice.
  6. Season with more salt/pepper if desired.
  7. Toss together and serve with oil/vinegar.
rainbow-power-greens-salad-with-black-eyed-peas6-1.jpg
CotterCrunch

Again, let me know in the comments how you like this salad, if you have any suggestions for it. Thank you for stopping by, and have a great day!

Brought to you by Jump In Wellness — Follow us on Twitter and like us on Facebook @Jumpinwellness

Arugula Lentil Salad (Vegan)

This salad will amaze you. It tastes super good, it is vegan and gluten-free, and it is healthy too! The total prep time is only about 10 minutes, it has 24 grams of protein, and only 660 calories which is pretty good for such a large dinner. I hope you try it out and tell me how you like it!

Arugula Lentil Salad

arugula-lentil-salad
More At HurryTheFoodUp

Ingredients (Yield- 2 Servings)

  • 3/4 cups cashews (3/4 cups = 100 g)
  • 1 onion
  • 3 tbsp olive oil
  • 1 chilli / jalapeño
  • 5-6 dried tomatoes (ideally in oil)
  • 3 slices whole wheat bread (None if gluten-free)
  • 1 cup lentils, cooked (1 cup = 1 can 15oz / 400 g)
  • 1 handful arugula (1 handful = 100 g)
  • 1-2 tbsp balsamic vinegar
  • Salt and pepper to taste

Optional

  • 1 small handful raisins
  • 1 tsp honey

Directions

  1. Roast the cashews on a low heat for about three minutes in a pan to maximize aroma. Then throw them into the salad bowl.
  2. Dice up and fry the onion in olive oil for about 3 minutes on a low heat.
  3. Meanwhile chop the chili/jalapeño and dried tomatoes. Add them to the pan and fry for another 1-2 minutes.
  4. Cut the bread into big croutons.
  5. Move the onion mix into a big bowl. Now add the rest of the oil to the pan and fry the chopped up bread until crunchy. Season with salt and pepper.

  6. Wash the arugula and add it to the bowl.
  7. Put the lentils in too, and mix them all around. Season with salt, pepper and balsamic vinegar. Serve with the croutons. Enjoy!
69ee7ed9aded842fcbd5836f060a7771
HurryTheFoodUp

Again, let me know in the comments how you like this salad, if you have any suggestions for it, and any suggestions for another recipe. Thank you fro stopping by and have a great day!

Brought to you by Jump In Wellness — Follow us on Twitter and like us on Facebook @Jumpinwellness


Chocolate Chip Cookie Dough ‘Blizzard’

Today we are going to look at an awesome dessert chocolate chip cookie dough ‘blizzard’ recipe. This recipe is completely vegan, gluten-free, and it tastes great too. Try it out and let me know how you like it!

Chocolate Chip Cookie Dough ‘Blizzard’

IMG_3029.jpg
More At OhSheGlows

Ingredients (Cookie Dough Balls 1 Cup)

  • 1/2 cup unsalted cashews
  • 1/4 cup rolled oats
  • 1/4 cup oat flour (or whole wheat pastry flour)
  • 1/2 tsp kosher salt
  • 1.5 tbsp natural cane sugar
  • 1/2 tsp pure vanilla extract
  • 3-4 tbsp pure maple syrup (or a bit more if dough is too dry)
  • 1/4 cup dark chocolate chips

Directions (Cookie Dough Balls)

  1. In a food processor, add the cashews and oats and process until it forms a fine crumble. Now add in the salt, sugar, and flour and process for a few seconds more.
  2. Add in the maple syrup and vanilla and process until combined. It will be sticky, but this is normal!
  3. Add in your chocolate chips and stir by hand or process. Form into balls. Store in freezer.

Ingredients (Blizzard 2 Servings)

  • 3 peeled and frozen bananas, cut into 1 inch chunks for easier processing
  • Splash of non-dairy milk (if needed)
  • 2 tbsp cookie dough (from above)

Directions (Blizzard)

  1. In a large food processor, add in your 3 frozen bananas.
  2. Process bananas, stopping to scrape down the sides of the bowl as necessary.
  3. Finally, add in your cookie dough and process until combined. You should have a soft serve type consistency when done. To make the blizzard simply stir in your desired amount of mini cookie dough balls, pour into a glass, and serve with a spoon. Enjoy!
IMG_2945-2
OhSheGlows

This blizzard should taste a lot like a blizzard from Dairy Queen. It has a great constancy when done and the cookie dough tastes amazing too. On top of that, it is completely vegan and gluten-free. I really hope you guys enjoy it, and thanks for stopping by. 

Brought to you by Jump In Wellness — Follow us on Twitter and like us on Facebook @Jumpinwellness


Rawberry Chia Jam

If you’re looking for a sweet spread try out this chia jam. It’s a great homemade jam, and super healthy too. This delicious spread is perfect on toast or crackers. Try it out and let me know how you like it.

Rawberry Chia Jam

The-Healthy-Hour-Rawberry-Strawberry-Raspberry-Chia-Seed-Jam-Healthy-Vegan-Easy-08-252.jpg
More At TheHealthyHour

Ingredients

  • 1 1/2 cups strawberries, fresh or frozen
  • 1/2 cup frozen raspberries
  • 3 tbsp chia seeds
  • 6 tbsp water
  • 3 tbsp maple syrup
  • 1 tbsp lemon juice, freshly squeezed
  • 1/2 tsp vanilla extract
  • pinch of sea salt

Directions

  1. In a small bowl, mix the chia seeds and water. Stir well and let it set for 5 minutes. Chia seeds will expand and create a thick gel-like texture.
  2. Add all ingredients except the chia gel into a blender. Pulse a few times until the mixture is smooth but still a little chunky.
  3. Add the chia gel into the blender and pulse a few more times. (I like to leave mine a bit chunky.)
  4. Pour the mixture into a airtight jar and enjoy!
The-Healthy-Hour-Rawberry-Strawberry-Raspberry-Chia-Seed-Jam-Healthy-Vegan-Easy-01-76
TheHealthyHour


You can top this jam on yogurt, baked goods, banana ice cream, toast or crackers. You can also add in some other berries to mix up the flavor. Let me know if you do that! Thanks for stopping by and checking todays recipe out! What would you like to see next week? Let me know in the comments! Have a good day. 

Brought to you by Jump In Wellness — Follow us on Twitter and like us on Facebook @Jumpinwellness


Baked Almond Feta “Cheese” With Herb Oil

This vegan cheese is amazing. It seriously tastes like real cheese and has the crumbly texture of feta. Baking the final dish makes it warm and crispy on the outside, but soft and gooey on the inside. Also, this will be a lengthy process and you will need some patience. You will soak blanched almonds for 24 hours, blend, chill overnight, and bake it for 35-40 minutes. But the final ‘cheese’ is worth the wait. Try it out before your next get-together!

Baked Almond Feta “Cheese” With Herb Oil

The-Healthy-Hour-How-To-Make-Epic-Vegan-Platter-Recipes-04-1785.jpg
More At TheHealthyHour and VegetarianTimes

Ingredients

  • 1 cup whole blanched almonds
  • 1/4 cup lemon juice
  • 3 Tbs. plus 1/4 cup olive oil, divided
  • 1 clove garlic, peeled
  • 1 1/4 tsp. salt
  • 1 Tbs. fresh thyme leaves
  • 1 tsp. fresh rosemary leaves

Directions

1. Place almonds in medium bowl, and cover with 3 inches cold water. Let soak 24 hours. Drain soaking liquid, rinse almonds under cold running water, and drain again.

2. Purée almonds, lemon juice, 3 Tbs. oil, garlic, salt, and 1/2 cup cold water in food processor 6 minutes, or until very smooth and creamy.

3. Place large strainer over bowl, and line with triple layer of cheesecloth. Spoon almond mixture into cheesecloth. Bring corners and sides of cloth together, and twist around cheese, forming into orange-size ball and squeezing to help extract moisture. Secure with rubber band or kitchen twine. Chill 12 hours, or overnight. Discard excess liquid.

4. Preheat oven to 200°F. Line baking sheet with parchment paper. Unwrap cheese (it will be soft), and transfer from cheesecloth to prepared baking sheet. Flatten to form 6-inch round about 3/4-inch thick. Bake 40 minutes, or until top is slightly firm. Cool, then chill. (Cheese can be made up to this point 2 days ahead; keep refrigerated.)

5. Combine remaining 1/4 cup oil, thyme, and rosemary in small saucepan. Warm oil over medium-low heat 2 minutes, or until very hot but not simmering. Cool to room temperature. Drizzle herb oil over cheese just before serving. Enjoy!


Tomorrow I will share the final part of this awesome vegan cheese platter. This is the Raw-berry Chia Jam. It tastes super good so I know you guys will like it. Thank you guys for stopping by and let me know how you like this recipe!

Brought to you by Jump In Wellness — Follow us on Twitter and like us on Facebook @Jumpinwellness

Homemade Hummus

Hummus is a must for any great cheese platter. Making your own dip will give you a better taste for not a lot of work. This recipe is rich, creamy, savory, and perfectly balanced. I hope you try out this hummus and also add it to your own cheese platter. 

Homemade Hummus

The-Healthy-Hour-How-To-Make-Epic-Vegan-Platter-Recipes-03-1784 (1).jpg
More At TheHealthyHour

Ingredients

  • 1.5 cups of cooked garbanzo beans, drained and rinsed
  • 2-3 tbsp extra virgin olive oil, plus more to taste
  • 2 tbsp tahini
  • Juice of 1 lemon
  • 2 garlic cloves, peeled and minced
  • 2 tbsp water
  • 1/2-3/4 tsp salt
  • Freshly ground black pepper to taste

Optional

  • About 1/2 tsp of cumin, to taste
  • About 1/4 tsp of coriander, to taste
  • Garnish with dash of paprika and chopped cilantro or parsley

Directions

  • Add all ingredients except olive oil into food processor, and blend until creamy and smooth.
  • While hummus is mixing, drizzle in olive oil and blend until creamy and smooth.
  • Taste and adjust the seasoning by adding more lemon juice, olive oil, or salt. Add a little bit of water to thin. Transfer to an airtight container and chill in fridge until ready to serve. Drizzle with extra olive oil and garnish with cilantro or parsley just before serving. Hummus keeps well in the fridge for up to a week. Enjoy!

Tomorrow I will be showing off some awesome vegan “cheese”! Be sure to check it out!

Brought to you by Jump In Wellness — Follow us on Twitter and like us on Facebook @Jumpinwellness

Pretty in Pink Beet Hummus

Fulfilling yesterdays promise, here is one of the three hummus recipes that is listed for the best cheese platter in the world (check out the recipe by clicking on the blue text.) This  pink spread brightens up the platter and adds a bit of change to what is normally on cheese platters. The roasted beets make the hummus extra flavorful, earthy, a little sweet.

Pretty in Pink Beet Hummus

The-Healthy-Hour-How-To-Make-Epic-Vegan-Platter-Recipes-02-1783.jpg
More At TheHealthyHour

Ingredients

  • 1.5 cups of cooked garbanzo beans, drained and rinsed
  • 1/4 cup extra virgin olive oil
  • 1 small beet, scrubbed, stems removed
  • 2 tbsp tahini
  • Juice of 1 lemon
  • 2 garlic cloves, peeled and minced
  • 2 tbsp water
  • 1/2-3/4 tsp salt
  • Freshly ground black pepper to taste

Optional

  • Chopped parsley leaves for garnish
  • Sprinkle of pine nuts or sesame seeds for garnish

Directions

  1. Preheat oven to 400 degrees Fahrenheit.
  2. On a baking tray, place beets on foil, drizzle with a bit of olive oil, and wrap tightly in foil. Roast for 40-45 minutes, until beets are tender enough to run a knife through easily.
  3. Let beets cool to room temperature, then peel the skin under running water with your hands. Add beets to food processor and process into smaller pieces.
  4. Add remaining ingredients except olive oil into food processor and blend until smooth. While hummus is mixing, drizzle in olive oil and blend until creamy and smooth. Chill in fridge until ready to serve. Garnish with parsley, pine nuts, and sesame seeds just before serving. Hummus keeps well in the fridge for up to a week.

Tomorrow I will be showing off the second of the three hummus’ listed. Be sure to check it out!

Brought to you by Jump In Wellness — Follow us on Twitter and like us on Facebook @Jumpinwellness

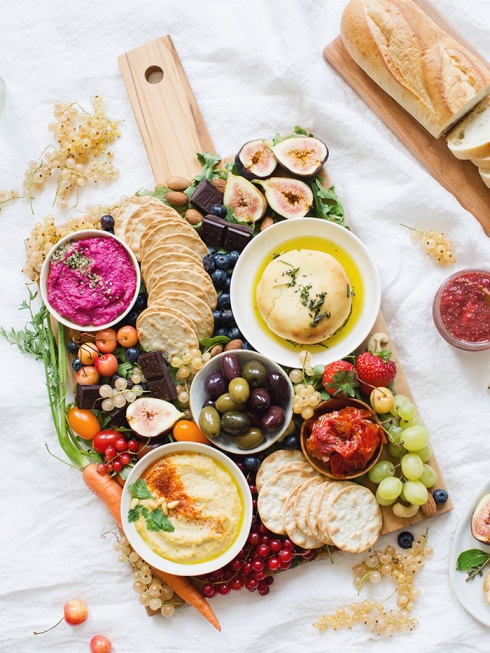
How To Make An Epic Vegan “Cheese” Platter

Cheese platters are one of the best things to have at dinner parties. When you’re vegan you sadly can not eat cheese, but that isn’t stopping us. Here is the vegan take on a large cheese platter. Also, the three humus recipes will be out in the next few days. Try it out!

The-Healthy-Hour-How-To-Make-Epic-Vegan-Platter-Recipes-01-1782.jpg
More At TheHealthyHour

Ingredients

  • A pretty wooden board
  • A minimum of 3 cheeses/dips (I used all vegan recipes. Scroll down for recipes!)
  • 3 savory extras
    • Marinated olives
    • Marinated red peppers
    • Nuts (almonds, brazil nuts, cashews, etc.)
  • 3 sweet extras
    • Fresh fruit (grapes, blueberries, strawberries, apricots, fresh figs, pear)
    • Dried fruit
    • Jam
  • Crackers
  • Arugula (and lots of it!)
  • High-quality dark chocolate 
  • Optional add-ons
    • Colorful raw veggie sticks: Red peppers, carrots, celery, cucumber, broccoli, cauliflower, cherry tomatoes
    • Wine of choice or sparkling water with lemon slices and fresh herbs

Tips

  • Imperfect is perfect when it comes to laying out these boards. Don’t make it too symmetrical, and let it flow organically.
  • The goal is to fill the platter up as much as possible, with no empty spaces showing through. It should be overflowing with a feeling of abundance (think Game of Thrones feast). Get lots of arugula and blueberries—they’ll be your best friends.
  • Save money by shopping in-season fruits and vegetables at the farmer’s market and using nuts and dried fruits from your pantry.

Layout

  1. Layer arugula generously before you lay ingredients on top. It will help make the board feel more full, prop up the ingredients, create dimension, and help everything stay in place.
  2. Place the three hero dishes/dips in different parts of the board. These will be your anchors.
  3. Swirl crackers around the hero dishes. Let it flow organically, and don’t put all the crackers out when serving—refill them as you need.
  4. Start layering and adding ingredients. This is where you can get playful and have some fun! Ingredients like marinated olives, red peppers, or veggie sticks can go into smaller bowls, while fruits can go directly on the board.
  5. Keep layering and filling in the empty spaces with more arugula, blueberries, and nuts.
  6. Finish up by adding pieces of really good dark chocolate—my favorite part!


The-Healthy-Hour-How-To-Make-Epic-Vegan-Platter-Recipes-03-1784
TheHealthyHour

Thank you for checking out this vegan cheese platter! I hope you liked this change of pace. Let me know what you would like to see next! Share this with your friends! The three humus recipes will be out in the next few days!

Brought to you by Jump In Wellness — Follow us on Twitter and like us on Facebook @Jumpinwellness

Vegan Pumpkin Blondies

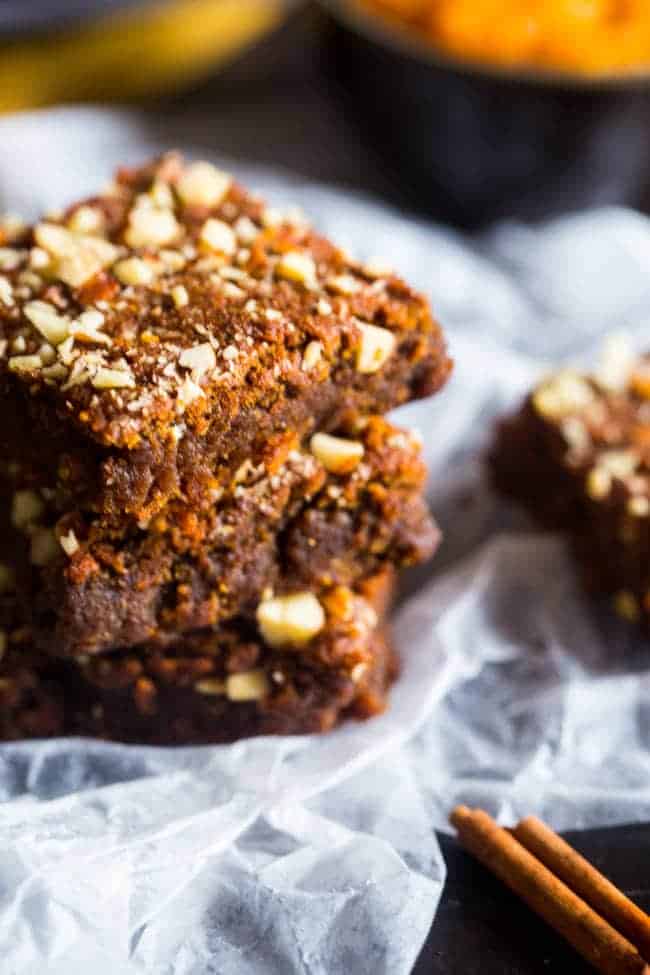
For the last day of the dessert week we are going to look at one of the best tasting desserts you can make! Check out these vegan pumpkin blondies. Everyone in the room can eat them, they’re not too unhealthy, and they taste amazing! See the recipe below!

Vegan Pumpkin Blondies

Read More At FoodNetwork

Ingredients: (Yield – 16 Servings)

  • ¾ cup creamy almond butter
  • 3 Tbsp pure maple syrup
  • ⅔ cup pure canned pumpkin
  • ½ cup coconut sugar, firmly packed
  • ½ Tbsp vanilla extract
  • ½ Tbsp apple cider vinegar
  • ¼ cup + 2 Tbsp coconut flour, sifted (31g)*
  • ½ tsp baking soda
  • ¼ tsp baking powder
  • ¼ tsp salt
  • ½ tsp cinnamon
  • ½ Tbsp pumpkin pie spice
  • 3 Tbsp almonds, finely chopped

Directions


1. Preheat your oven to 325ºF and line the bottom of an 8×8-inch square baking pan with parchment paper and spray the sides generously with coconut oil spray. 

2. In a large, microwave-safe bowl, melt the almond butter with the maple syrup in the microwave until the almond butter is creamy, about 1 minute.

3. Add the pumpkin into the mixture and beat with an electric hand mixer until well combined, scraping the sides down as necessary.

4. Beat the coconut sugar, vanilla and apple cider vinegar into the almond butter mixture until well combined.

5. Add the sifted coconut flour, baking soda, baking powder, salt, cinnamon and pumpkin pie spice into the mixture and stir until smooth and well combined. Make sure you scrape all the flour off the sides of the bowl into the mixture.

6. Pour the batter into the prepared pan and smooth out evenly. Sprinkle with the chopped nuts. Let the batter stand for 5 minutes before baking, to allow the coconut flour to begin absorbing the moisture.

7. Bake until a toothpick inserted into the center comes out clean and the edges are crisp, about 50-55 minutes. Let cool completely before cutting into bars. Enjoy!

FoodNetwork

Thank you for reading. I hope you guys enjoyed this weeks topic of desserts. If you have any suggestions for next weeks topic let me know in the comment section! Also, if you change up the recipe or add more spices tell me too! Thanks for reading and have a great day.

Brought to you by Jump In Wellness — Follow us on Twitter and like us on Facebook @Jumpinwellness

Coconut Cashew Rice Pudding

The Coconut Cashew Rice Pudding has an amazing flavor, it looks great, and it is so easy to make. You use a great tasting cashew milk, paired with coconut to make a rich flavorful rice pudding. Remember to make extra though because these things will go fast! Try it out and tell  me how you like them!

Coconut Cashew Rice Pudding

More At FoodNetwork

Ingredients: (Yield – 4 Servings)

  • ½ cup raw cashews
  • 1 cup coconut milk
  • ¼ cup Arborio rice
  • 3 Tbsp sugar
  • 2 tsp finely grated lime zest
  • 1 tsp vanilla extract
  • fresh berries, coconut, and/or toasted cashews for garnish

Directions

1. Put the cashews in a blender or food processor with 1 cup of water and puree until smooth (you will not have to strain this).

2. Place the cashew milk, coconut milk, rice, sugar and lime zest in a medium saucepot and whisk while bringing it up to a simmer over medium heat. Cover loosely and continue to simmer gently, stirring often, until the rice is tender, about 25 minutes. Remove the pot from the heat and stir in the vanilla. Cool the pudding to room temperature and then chill before serving.

3. Serve the pudding garnished with fresh berries, coconut shavings and/or toasted cashews.

FoodNetwork

Thank you for reading. I hope you guys enjoy this weeks topic of desserts. All of these are pretty healthy (at least better than the non-vegan alternatives.) If you have any suggestions of a new topic or a type of dessert let me know in the comment section. Thanks for reading and have a great day. 

Brought to you by Jump In Wellness — Follow us on Twitter and like us on Facebook @Jumpinwellness